
Watercolor WIP (Work In Progress) Watercolor Class
Posted Oct-15-06 09:54:02 PDT Updated Oct-15-06 10:17:02 PDT
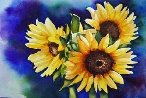
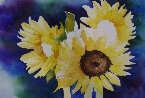
Alot of people have asked me, so how does one go about creating a watercolor? So many people are inhibited by it as it is so unforgiving, for instance, once you've made a mistake, theres not a whole lot that you can do to correct the mistake. I will show you certain steps that one takes to achieve a finished piece. Grant it, there are many different techinques in watercolor, this particular one will show you a few.
Techniques you will learn: Things You Will Learn
Wet into Wet Recognizing Your Light Source
Using Salt to create texture Primary and Secondary Colors
Glazing Creating Value In Your Painting
Leaving the Whites
Creating a hard and soft edge
Primary Colors: Red, Yellow, and Blue –
Primary colors are basically, three colors which can approximate, through selective physical mixture, all of the other colors we see yet cannot themselves be produced through mixture with any satisfactory degree of intensity.
Secondary colors: Orange, Green and Violet
Secondary colors are colors which can be simulated by mixing primary colors.
In this painting we’ll basically use primary colors, utilizing their different values, by adding layers of pigment and water, (which is called, glazing) either by a different color of pigment or by mixing red with yellow, yellow with green, etc. to create different values.
Value: locates a color’s approximate position in relation to white and black. A light color such as a yellow is high in value (closer to white) and a dark color such as a violet or blue is low in value (closer to black) Understanding value will help you to determine appropriate color combinations and simulating form or dimensional depth in painting.
Glazing: Adding layers of color to create depth and value.
Hard Edge: Laying wet color onto dry paper
Soft Edge: Laying water on and around dry paper, and adding color carefully
Steps:
Draw or transfer photo onto paper
Note light source from top center
Notice which areas of the flower have the lightest value, Utilizing more or no water where you want to keep the whites white, using water and yellow (gamboges yellow or cad yellow is fine) for the pedals and leaves.
Lay in a wash of yellow to center of stamens.
Add darker shades of the pedals which are in shadow using secondary colors, Either mix your yellow and red, or use burnt sienna.
Once dry wet your leaves where you want the least amount of pigment, keeping the darker shaded areas dry, then add your sap green.
Add brown madder to stamens, allowing it to dry a bit, but while still shiny add salt for texture.
Wet the outer parameter of your flowers with clean water, then add dark pigment (blues, violets, green, whatever strikes your fancy, creating a hard edge next to the petals, pull your color into the water to create an outer soft edge.
Remove salt
Sign painting

5 comments:
Great post! I'm looking forward to the next one.
Welcome to the wonderful world of blogs :)
Beth
Do you have a link to your Ebay site???
:)
Yes, It's
http://search.ebay.com/_W0QQsassZlaartgalleryQQhtZ-1
Lori,
I love your wip...and didactic posts....I'll put a link in VIM, this is WONDERFUL. ambercolumbia
Thank you Amber. I'll do the same with VIM. :)
Post a Comment