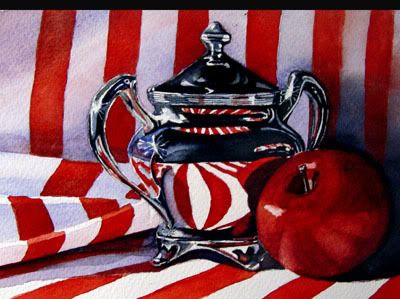
I found a great photo on an art group I belong to that showed so much depth and lovely color in this, and just had to try and paint it. Here is a little wip to show how it was completed.
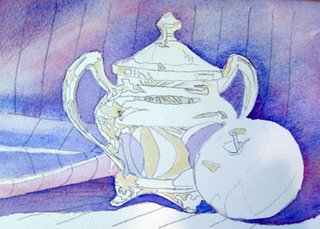
After drawing my sketch to where I wanted it just right I traced it onto my paper. and masked out the areas on the on the pot and apple that I wanted left white.
Next I came in with rose madder, cobalt blue, and a touch of alizarian for my first light washes of shadows. Let that dry and realized my shadows weren't quite dark enough, it's a tough thing to decide esp. when your object is white. When the whole painting or the black areas of the teapot are filled in these shadows you see here will not look as dark as they appear here.
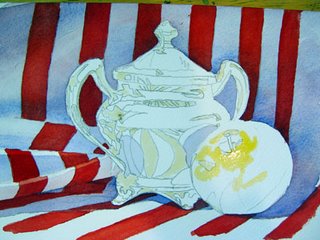
I then came in with just a primary red, cadmium red on the stripes, let that dry and then did a mixture of cad red and alizarian red together with a touch of french ultramarine for the darker areas, you can see between the folds of the striped cloth and behind and underneath they apprear darker, even though I've used my underpainting with the shadows effect it wasn't dark enough.

Next I started layin in the red on the silver pot using the same process, light first and then adding darker as I see fit. You'd be surprised at what silver reflects, it reflects everything, even down to hair folicle size on the arms of the jug. I also added a wash of yellow ochre to the apple on top where I wanted the lightest to be, normally one would prob. paint the whole apple with initial wash of cadmium yellow, but my plan was to saturate the apple as it will fade to black shadow on the right in the end, so I don't think my yellow would even be a bleed through enough to see it, so I don't bother.
Then I go over the lid with my lightest wash of ultramarine blue and a hint of turquoise. Making sure to leave enough whites where the reflections are. Let that dry, and then come in with clear water on the far left side as this is where my light is coming from, and saturate with water, then take a fully load brush with indigo on the right and gently let it bleed over. creating a hard at the top of the line where the black ends while still creating a soft edge in the middle.
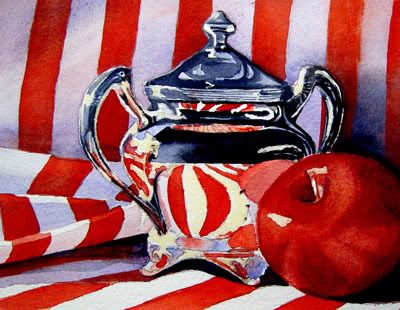
After this is dry, I wet all around the areas I want left lighter on the apple, if you'll notice on the apple you can faintly see the white stripes of the cloth in the apple. So I attempted to make sure that the reds were much lighter in these spots. Before it is dry I use the pull out method where the whites of the stripes are trying not to create a hard edge, which is kind of impossilbe at this stage so I go in after it is dry with clear water, very little I might add and soften the edges.
Here, I've just done more of the same as explained above, however, since colors reflect different values when they are on a different plain, I've also lightened the stripes a bit on the silver area, also adding a darker hue where the apples shadow is on the silver. Once all is dry I look at my painting to see where I may have left out some details. This is always the case with me, as I get going and always seem to leave some detail out. I see that my left handle needs some more detailing with red and black, and add them in with dry brush.
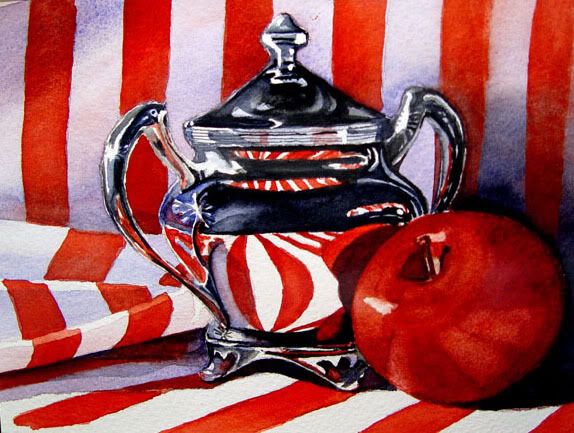
I wanted that fade to the dark on the right side, so I completely wet the whole right side with clean water, then go in with my purple and paynes grey to add more darks around the apple and jug. Also, I've added more darks with alizarian,cad and paynes grey to the inside of the core of the apple. I want this to glisten so I used a hint of goauche for the sparkle parts on the silver, not too much, and making sure you wouldn't even see it if you were to tip it on it's side, we only want a watercolor here right? I know the professionals would kill me for this.,,,but.....
Then I take off the frisket and add clear water to the whites and soften my edges. It's done.
