Monday, December 11, 2006

Apple For Santa


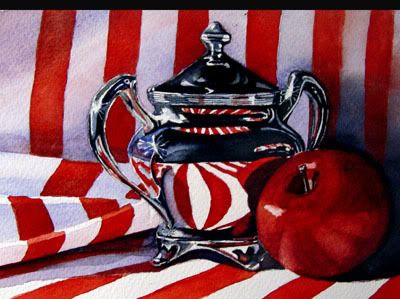
I found a great photo on an art group I belong to that showed so much depth and lovely color in this, and just had to try and paint it. Here is a little wip to show how it was completed.

After drawing my sketch to where I wanted it just right I traced it onto my paper. and masked out the areas on the on the pot and apple that I wanted left white.

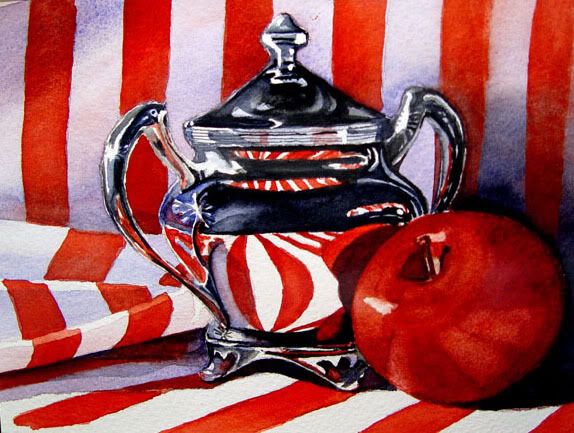
Next I came in with rose madder, cobalt blue, and a touch of alizarian for my first light washes of shadows. Let that dry and realized my shadows weren't quite dark enough, it's a tough thing to decide esp. when your object is white. When the whole painting or the black areas of the teapot are filled in these shadows you see here will not look as dark as they appear here.

I then came in with just a primary red, cadmium red on the stripes, let that dry and then did a mixture of cad red and alizarian red together with a touch of french ultramarine for the darker areas, you can see between the folds of the striped cloth and behind and underneath they apprear darker, even though I've used my underpainting with the shadows effect it wasn't dark enough.

Next I started layin in the red on the silver pot using the same process, light first and then adding darker as I see fit. You'd be surprised at what silver reflects, it reflects everything, even down to hair folicle size on the arms of the jug. I also added a wash of yellow ochre to the apple on top where I wanted the lightest to be, normally one would prob. paint the whole apple with initial wash of cadmium yellow, but my plan was to saturate the apple as it will fade to black shadow on the right in the end, so I don't think my yellow would even be a bleed through enough to see it, so I don't bother.

Then I go over the lid with my lightest wash of ultramarine blue and a hint of turquoise. Making sure to leave enough whites where the reflections are. Let that dry, and then come in with clear water on the far left side as this is where my light is coming from, and saturate with water, then take a fully load brush with indigo on the right and gently let it bleed over. creating a hard at the top of the line where the black ends while still creating a soft edge in the middle.

Photobucket - Video and Image Hosting
After this is dry, I wet all around the areas I want left lighter on the apple, if you'll notice on the apple you can faintly see the white stripes of the cloth in the apple. So I attempted to make sure that the reds were much lighter in these spots. Before it is dry I use the pull out method where the whites of the stripes are trying not to create a hard edge, which is kind of impossilbe at this stage so I go in after it is dry with clear water, very little I might add and soften the edges.

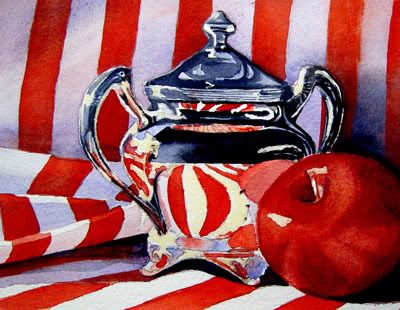
Here, I've just done more of the same as explained above, however, since colors reflect different values when they are on a different plain, I've also lightened the stripes a bit on the silver area, also adding a darker hue where the apples shadow is on the silver. Once all is dry I look at my painting to see where I may have left out some details. This is always the case with me, as I get going and always seem to leave some detail out. I see that my left handle needs some more detailing with red and black, and add them in with dry brush.

Photobucket - Video and Image Hosting

I wanted that fade to the dark on the right side, so I completely wet the whole right side with clean water, then go in with my purple and paynes grey to add more darks around the apple and jug. Also, I've added more darks with alizarian,cad and paynes grey to the inside of the core of the apple. I want this to glisten so I used a hint of goauche for the sparkle parts on the silver, not too much, and making sure you wouldn't even see it if you were to tip it on it's side, we only want a watercolor here right? I know the professionals would kill me for this.,,,but.....

Then I take off the frisket and add clear water to the whites and soften my edges. It's done.
Photobucket - Video and Image Hosting

Thursday, November 16, 2006

Watercolor Painting WIP Bird on a Wire


Well, Thought I'd do another WIP, as I find these to be so much fun,and a learning experience


for myself as well.

Here is the beginning sketches of a quilt hanging from a clothesline with a bird, not sure yet, but I'll probably add another bird, as I hate to see one so cozy all alone, but for now there's one. :)

I first drew all of my pathes out, then came in with mixture of alizarin, blue and ochre for my first was for the lightest of shadows in the quilt, let that dry and then where the shadows are deeper I added another layer, a little bit darker. More to come tomorrow. Wel, since this is for my mother and she loves her cardinals, I decided to make the birds cardinals also because of their lovely red. and eliminated the other bird on the right. I masked in the white of the bandana patches, and started with all the different designs, adding hints of more shadow where I felt it wasn't dark enough. To tone down the blues so theyre not so vibrant, I added hints of alizarian and french ultramarine. I think next week I'll begin my birds before I go any further on the quilt, If I screw up the birds, I'll have done all that patchwork for nothing.. Whew, thank goodness I'm not sewing this. :) LOL

Sunday - November 19th, well I did a little more painting of the patches today, still researching the type of birds and what they look like before I paint them in, I found out you normally will only see a cardinal by itself, as they look out for their mates, as one eats. More next week. :)

Wednesday, November 08, 2006

Watercolor WIP Work In Progress


Well, I finished an ACEO size of this painting, now I'm going to start a new one, sixe 12x14 with different colors but same still life objects. The title to this painting "Time Flies" I wanted to express how quickly our children grow up, how quickly our lives become a passing in the night, and how important every minute of every day spent with your children is so important. I can remember when my boys were just babies and now they're toddlers, It seems like yesterday I was putting these little booties on their tiny feet, and swaddling them in my arms with this blanket and feeding them their 3:00 a.m. bottle of milk. This is a tribute to them and to remind others "Don't miss a minute of your childrens life, and take that extra second to tell the people in your life that you love them".

Okay, for the painting, First I start out with my basic sketch and outline my areas with frisket that I want to stay as a PURE white, let that dry, and then I lay in pigments where my shadows are with dioxine violet, alizarian, and new gamboge.

Then I start to lay in some basic colors of each square quilt with peonypink, and a touch of burnt sienna, and cobalt on the quares. Then I begin to build up color in the bottle with light washes of cobalt, paynes grey, and peonypink.

As I tend to have an ADD problem, and my patience for the "outcome" to be done quickly, I go ahead of myself sometimes, and start to fill in details, too soon, so I can get excited about the painting before my boredom sets in with all the steps it takes in watercolor. So here as you can see I started some of the detail before I probably should have. Nonetheless, the next correct steps would be to fill in the lines on the patches, using the cobalt blue and peonypinks again. I also put another layer of gamboge hue on the booties, to create an antiqued fade, also as we know, nothing is pure white, a layer on the top of the clock glass as well, and adding another layer of paynes grey to the left side of the clock as it is being shadowed by the lip. Also adding some reflective colors onto the metal of the clock near the pink patch. and then coming in with darker hues of paynes grey for outline of the metals, making sure to leave some whats for the reflections of light on the metal.

For the bottle I thoroughly wet the underside with clear water, then coming in wet on dry at the top where the shadow is with indigo and alizarin, and pulled it down for gradation of color. The nipple on the bottle is fun to do, as I love the old yellow look of that rubber, plus its a little difficult to keep it "soft". I used a mixture of yellow ochre, and burnt sienna. Also, used this mixture for a golden metal on the screw of the clock, then finishing the clock with paynes grey and indigo. For the letters and indicators I used lamp black, which may have been a mistake, a little too dark. More commenting later. Thanks for Visiting.

Sunday, October 15, 2006


Watercolor WIP (Work In Progress) Watercolor Class
Posted Oct-15-06 09:54:02 PDT Updated Oct-15-06 10:17:02 PDT
Alot of people have asked me, so how does one go about creating a watercolor? So many people are inhibited by it as it is so unforgiving, for instance, once you've made a mistake, theres not a whole lot that you can do to correct the mistake. I will show you certain steps that one takes to achieve a finished piece. Grant it, there are many different techinques in watercolor, this particular one will show you a few.

Techniques you will learn: Things You Will Learn
Wet into Wet Recognizing Your Light Source
Using Salt to create texture Primary and Secondary Colors
Glazing Creating Value In Your Painting
Leaving the Whites
Creating a hard and soft edge

Primary Colors: Red, Yellow, and Blue –
Primary colors are basically, three colors which can approximate, through selective physical mixture, all of the other colors we see yet cannot themselves be produced through mixture with any satisfactory degree of intensity.

Secondary colors: Orange, Green and Violet
Secondary colors are colors which can be simulated by mixing primary colors.

In this painting we’ll basically use primary colors, utilizing their different values, by adding layers of pigment and water, (which is called, glazing) either by a different color of pigment or by mixing red with yellow, yellow with green, etc. to create different values.

Value: locates a color’s approximate position in relation to white and black. A light color such as a yellow is high in value (closer to white) and a dark color such as a violet or blue is low in value (closer to black) Understanding value will help you to determine appropriate color combinations and simulating form or dimensional depth in painting.

Glazing: Adding layers of color to create depth and value.

Hard Edge: Laying wet color onto dry paper
Soft Edge: Laying water on and around dry paper, and adding color carefully

Steps:

Draw or transfer photo onto paper
Note light source from top center
Notice which areas of the flower have the lightest value, Utilizing more or no water where you want to keep the whites white, using water and yellow (gamboges yellow or cad yellow is fine) for the pedals and leaves.
Lay in a wash of yellow to center of stamens.
Add darker shades of the pedals which are in shadow using secondary colors, Either mix your yellow and red, or use burnt sienna.
Once dry wet your leaves where you want the least amount of pigment, keeping the darker shaded areas dry, then add your sap green.
Add brown madder to stamens, allowing it to dry a bit, but while still shiny add salt for texture.
Wet the outer parameter of your flowers with clean water, then add dark pigment (blues, violets, green, whatever strikes your fancy, creating a hard edge next to the petals, pull your color into the water to create an outer soft edge.
Remove salt
Sign painting